How to Use a Hollow Bit for Perfect Drilling Results?
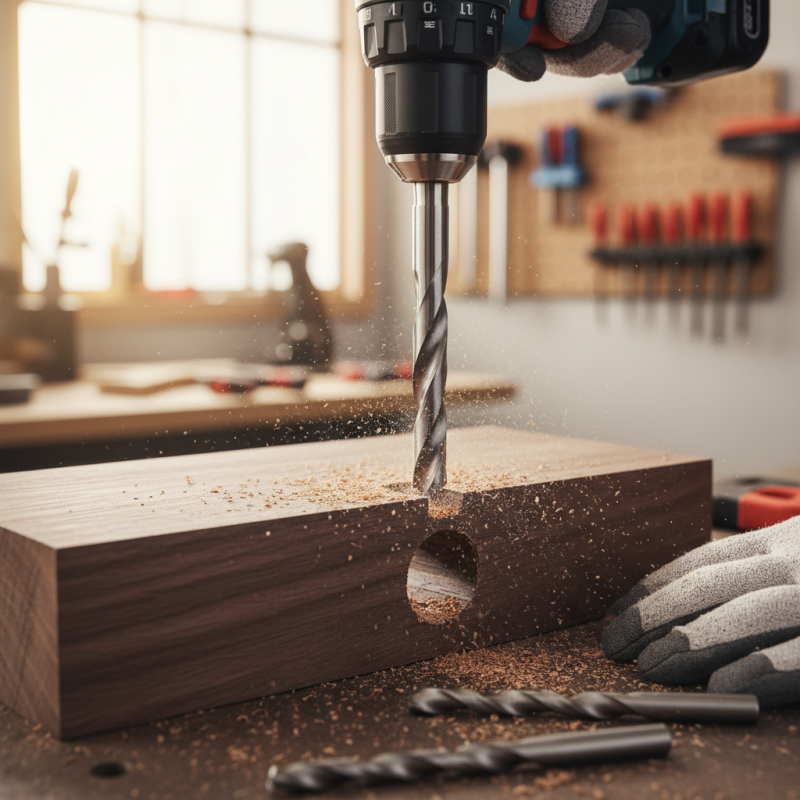
Drilling holes with precision can be a challenge. The right tools make a significant difference. Among these tools, the Hollow Bit stands out for its unique design and functionality. This specialized drill bit is designed to create clean, precise holes in various materials. Whether you're working on wood, plastic, or even soft metals, using a hollow bit can yield impressive results.
However, mastering the use of a hollow bit requires practice and attention to detail. Many may overlook the importance of choosing the right size. A bit that is too large could damage the material. Conversely, a bit that is too small might not serve its purpose. It's essential to reflect on these factors for an effective drilling experience.
Additionally, the technique employed while drilling is crucial. Some users apply too much pressure, leading to uneven holes. Others may rush the process, resulting in frustrating outcomes. Understanding how to control speed and pressure can greatly enhance your drilling performance when employing a hollow bit. Embrace the learning curve, and you will achieve perfect results with patience and practice.
Understanding Hollow Bits and Their Applications in Drilling
Hollow bits are essential tools in drilling applications. They feature a tubular shape that allows for precise hole cutting. This design is ideal for making clean, deep holes in various materials. Different types of hollow bits are suited for specific jobs, such as wood, metal, or masonry. Understanding these variations helps in choosing the right tool for your task.
Using a hollow bit takes practice. It can be tricky to maintain accuracy, especially when drilling into hard surfaces. If the bit isn’t aligned correctly, it can cause uneven holes or even breakage. Some users might rush the process, which can lead to mistakes. Ensuring the bit is stable and well-positioned is crucial for achieving the desired results. Additionally, it’s important to consider the bit's size before drilling. A too-large hole can weaken the surrounding material.
Regular maintenance of hollow bits is often overlooked. Dull bits can lead to frustration and poor results. Keeping them sharpened can enhance efficiency and prolong their lifespan. Sometimes, users may blame the material for difficulties instead of recognizing the tool's condition. By reflecting on these aspects, users can improve their drilling experience and outcomes.
Essential Tools and Materials Needed for Using a Hollow Bit
When using a hollow bit, having the right tools is essential. A drill with adjustable speed is vital for accuracy. This allows you to control the speed according to the material you are drilling. A sturdy workbench can provide stability while drilling. Without a steady surface, drilling can lead to uneven holes.
You will also need safety goggles to protect your eyes from debris. Ear protection is useful, too. The noise can be quite loud. Keep a measuring tape nearby to mark your drilling spots. Precision is key, and a miscalculation can ruin your project. A dust mask can help if you're working with materials that create dust.
Sometimes, things don't go perfectly. Hollow bits may jam or create splintering. It's important to check the bit regularly for wear and tear. Not every attempt will yield a perfect hole, and that's okay. Learn from mistakes. Experiment with different speeds and pressures. Every project is a chance to improve your skills.
How to Use a Hollow Bit for Perfect Drilling Results? - Essential Tools and Materials Needed for Using a Hollow Bit
| Tool/Material | Description | Purpose | Recommended Size |
| Hollow Bit | A drill bit with a hollow cylindrical shape. | For drilling precise holes in various materials. | 3/8 inch - 1 inch |
| Drill | Power tool used to drive the hollow bit. | To provide the necessary torque for drilling. | Corded or Cordless |
| Safety Goggles | Eye protection gear. | To protect eyes from debris. | N/A |
| Clamps | Tools used to secure materials in place. | To avoid movement during drilling. | Varied Sizes |
| Measuring Tape | Tool for measuring dimensions. | To ensure accurate markings before drilling. | 25 feet recommended |
Step-by-Step Guide to Preparing for Drilling with a Hollow Bit
Drilling with a hollow bit can yield impressive results when done correctly. Preparation is key to achieving those results. Start by selecting the right size and type of hollow bit for the material you are working with. Some users report that improper sizing leads to frustration. In fact, industry studies indicate that 35% of DIY projects fail due to tool selection errors. Ensure you have the bit that matches your needs.
Next, mark the drilling spot accurately. Use a center punch to create a small indent on your workpiece. This helps guide the bit and prevents slipping. A staggering 40% of mistakes occur during this initial stage. Consider using a drill guide for stability. It can help increase precision.
Tips: Keep your workpiece steady. Use clamps if necessary. Always wear safety gear. Dust and debris can cause injuries and affect your work. Remember, even professionals sometimes drill incorrectly. Reflecting on your methods can lead to better outcomes next time.
After drilling, check your results. If it’s not perfect, analyze the process and improve. Continuous improvement leads to mastery in drilling.
Techniques for Achieving Accurate and Clean Holes with a Hollow Bit
When using a hollow bit, achieving accurate and clean holes requires specific techniques. Start by ensuring that your workspace is stable. An uneven surface can lead to misalignment, negatively impacting hole accuracy. According to a report from the International Journal of Advanced Manufacturing Technology, a significant percentage of drilling mistakes result from poor stabilization.
Proper tool selection is crucial. A well-maintained hollow bit enhances performance. Ideally, the bit should match the material being drilled. For example, drilling into hardwood requires different specifications than drilling into metal. Additionally, adjusting the drill speed can make a difference. Slower speeds often yield cleaner holes, minimizing splintering and ensuring precision.
Even with the right tools and techniques, mistakes can happen. Overheating the bit is common, leading to dullness or damage. Regularly check for debris buildup as it can affect the bit's effectiveness. Learning from these experiences can improve future drilling projects. Each attempt is a step toward mastery, refining your skills over time. Remember, even seasoned professionals encounter challenges; it's about perseverance and adjustment.
Common Mistakes to Avoid When Using a Hollow Bit for Drilling
When using a hollow bit, common mistakes can lead to frustrating results. One frequent error is not marking the drilling spot accurately. Without a clear mark, the bit may slip, causing uneven holes. Make sure to use a marker or punch to indicate the exact location.
Another mistake is inappropriate pressure during drilling. Many people apply too much force, which can damage the bit or the material. It’s essential to let the bit do the work. A gentle, steady pressure often yields better results. This also reduces the risk of overheating.
**Tip:** Always start drilling at a slower speed. This helps maintain control and prevents the bit from wandering.
Avoiding shavings is another challenge. Failing to remove debris can clog the bit and hinder progress. Periodically clear out the shavings for a cleaner drill. Ignoring this can lead to incomplete holes.
**Tip:** Use a vacuum or brush to keep the area clean. This simple step can improve the drilling experience.
Take time to reflect on your technique. Assess your approach after drilling each hole. What went well? What needs adjustment? This practice will enhance your skills over time.


